This blog is supported through the affiliate links below
How To Package and Ship Artwork - The Best Way I've Found for Prints & Originals

Note: This blog contains affiliate links and purchasing through them supports our site at no extra cost to you.
Packaging and shipping artwork is challenging!

For my art prints and canvas paintings, I use heavy duty 30x40” double-walled corrugated cardboard pads from U-line, but you can find cardboard from other sources. Just make sure that it's good, durable cardboard and that you always use quality tape to seal it up and hold the pieces together. I use double-walled cardboard rather than single-walled because it’s structural integrity is designed to keep flat items from bending. Using a box cutter, I cut the appropriate size of cardboard. For prints it’ll be about the size that gives me about an extra inch of space around a print and maybe an extra 3 or 4 inches for shipping large canvas paintings or framed paintings. I fold each piece of cardboard around the edges approximately a ½” to give a little bit of height so there is a cradle for the print to sit in. For multiple prints in one package, I’ll cut a more generous piece of cardboard to accommodate the space required. Compared to a box, using these corrugated pads reduces the dimensions, which reduces the weight and shipping costs, all while maintaining the ultimate protection throughout the shipping process.

Speaking of ultimate protection, something I’ve learned along the way is that bubble wrap isn’t as important as you think it is. Specifically when it comes to packaging and shipping artwork, you would think that using bubble wrap is logical because everything we see shipped to our homes comes with it so why not use it to protect your own artwork? While it may have some benefits, all bubble wrap really is, is a waste of unused space. It increases the dimensions and shipping costs, and hardly offers any protection from bending.

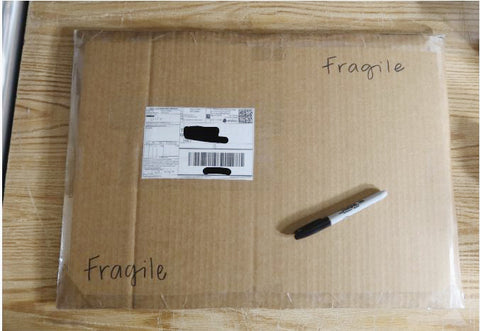
Instead of bubble wrap, I use single-walled, small corrugated pads that are pre-cut to size of the prints (again I find mine on Uline) as a backing for each print I send and then I use a clear cellophane wrap that goes over and around the print and cardboard backing. This acts as an additional layer of protection from the elements as well as provides a neat presentation. For canvases, I use a similar, but more involved method and I use double-walled cardboard as the backings.


The plastic wrap makes for a fantastic presentation upon opening. This has always been my favorite method.

When I have my cardboard cut with their edges folded, whether it’s an art print or a canvas, I lay it in the center and make sure that the surrounding space is equivalent on all four sides. I use Scotch blue painters tape to secure the four sides (more tape if it’s a canvas) to the cardboard. It’s much easier to remove painters tape than shipping tape and it won’t damage the cellophane when you remove it. Depending on how many prints are in the order, I’ll lay a single print face up, with a letter of thanks and framing instructions folded behind the print so it doesn’t damage the actual art. If there are two prints, I’ll lay each one with art facing towards the center, so the cardboard backings are facing the outside and are against the packaging. The main priority is protecting the artwork.


After everything is taped up and double checked, I go ahead and put the other piece of cardboard over top. I make sure that the two pieces of outer cardboard aren’t tightly squeezing the print(s), if it looks like it’s more snug than I would like, I’ll go over and refold the edges so they have a little more space between them. The same goes for canvas.

When you’re ready for the final taping step, I found that heavy duty shipping tape works the best; some tapes don’t adhere to cardboard well. I use smaller pieces of tape to tape each side so that they don’t move and then I go over and use a single piece of tape measured accordingly for each side. I lay tape on one side and fold it as best I can over to the other for each one. After all four sides are taped, I add a smaller piece of tape to each corner which folds down any excess tape and acts as an additional protection for the corners. I’ll tape the shipping label on it and use a Sharpie to write “Fragile” in multiple places.


Grow Your Painting Skills and Resources
Instant access to 1000s of royalty-free reference photos of landscapes and wildlife as well as step by step oil painting videos. Checkout My Memberships for more info.
I'm Chuck Black, landscape and wildlife artist based in Southwest Montana.
Explore More